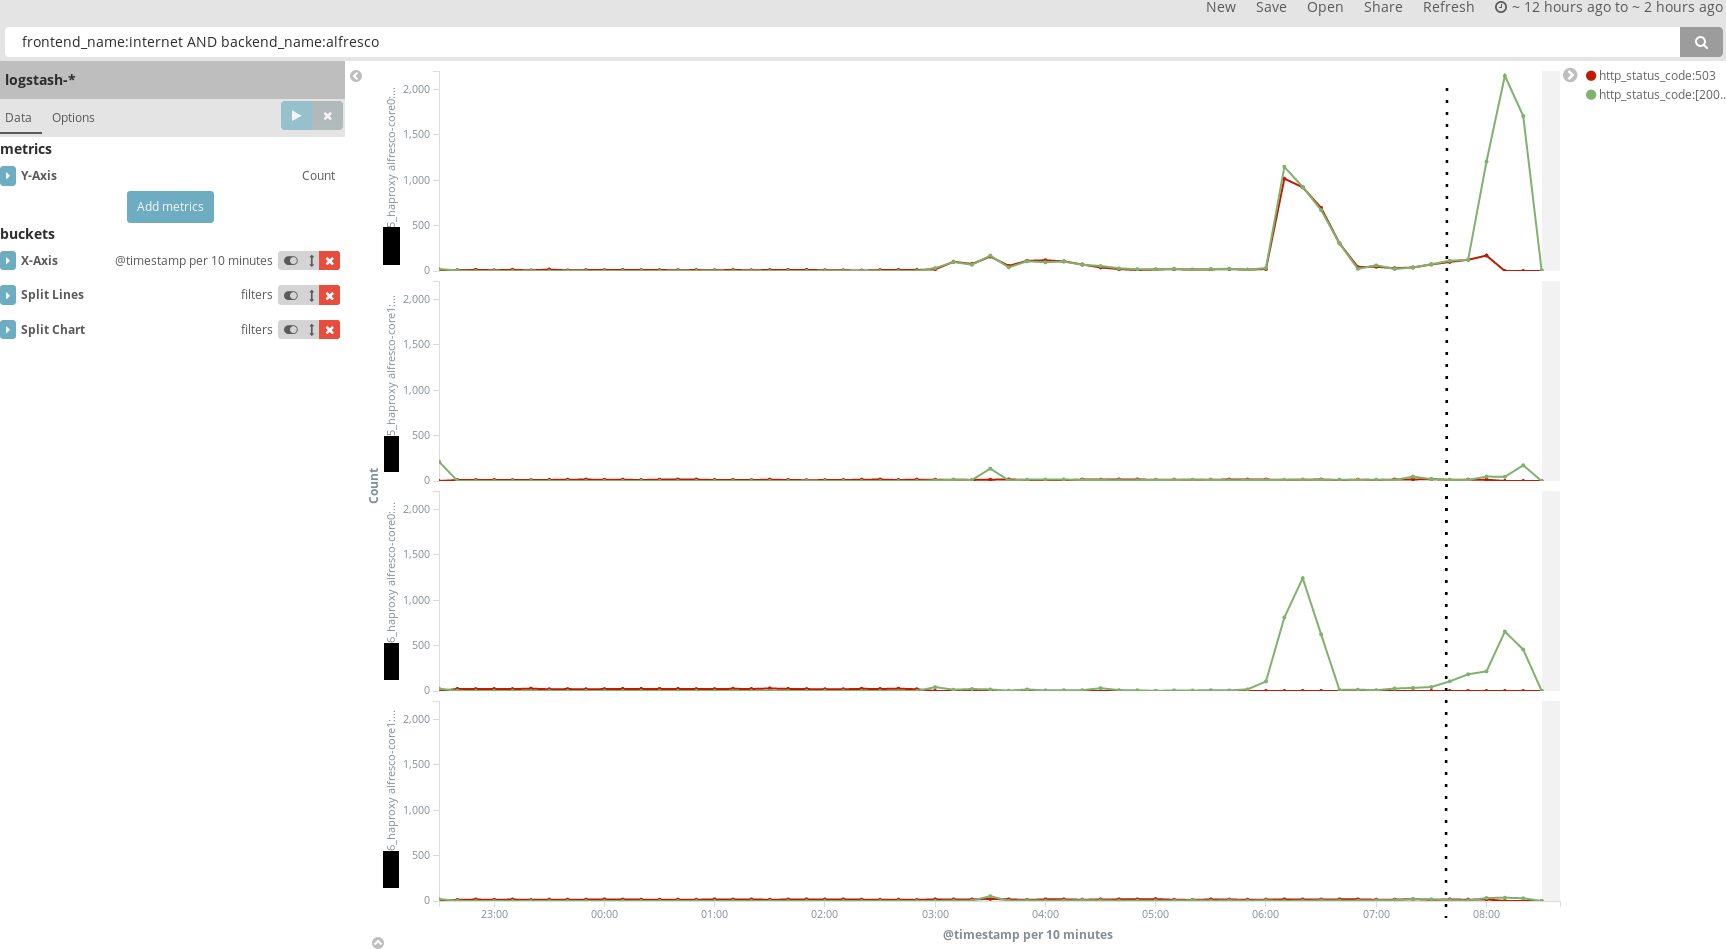
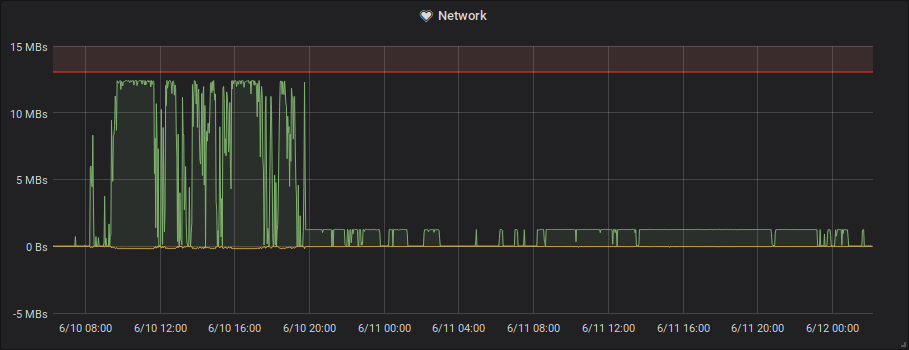
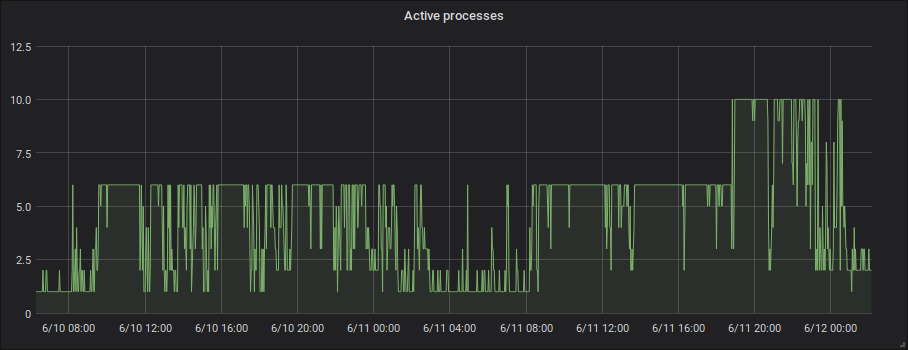
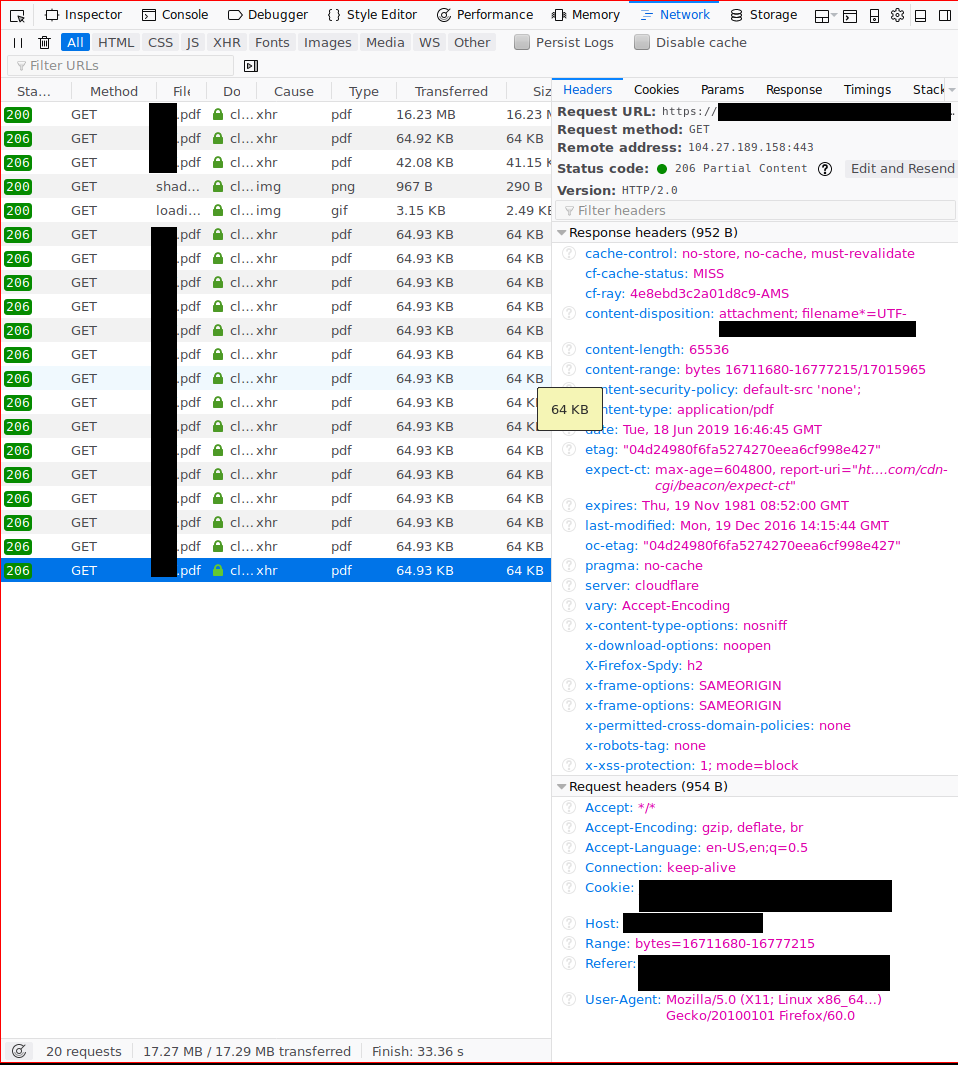
<?xml version="1.0" encoding="utf-8"?><feed xmlns="http://www.w3.org/2005/Atom" ><generator uri="https://jekyllrb.com/" version="4.2.0">Jekyll</generator><link href="/feed.xml" rel="self" type="application/atom+xml" /><link href="/" rel="alternate" type="text/html" /><updated>2024-02-02T22:42:59+00:00</updated><id>/feed.xml</id><title type="html">blog.vbgn.be</title><author><name>Lars Vierbergen</name></author><entry><title type="html">Haproxy reloads and HTTP keep-alive</title><link href="/2021/02/15/haproxy-reload-keepalive.html" rel="alternate" type="text/html" title="Haproxy reloads and HTTP keep-alive" /><published>2021-02-15T00:00:00+00:00</published><updated>2021-02-15T00:00:00+00:00</updated><id>/2021/02/15/haproxy-reload-keepalive</id><content type="html" xml:base="/2021/02/15/haproxy-reload-keepalive.html"><![CDATA[<p>This December 2019 production outage is brought to you by Haproxy and HTTP keep-alive.</p>

<h1 id="the-setup">The setup</h1>

<p>At a customer, we have a clustered Alfresco setup with docker containers.
This is a high-availability setup with two nodes.
Clients connect through an externally managed F5 loadbalancer, which then connects to one of our Haproxy loadbalancers.</p>

<p>Under normal conditions, Haproxy sends traffic to both Alfresco servers.
The setup with two levels of loadbalancers is made because we want to be able to disable an Alfresco backend during deployments.</p>

<pre><code class="language-mermaid">graph LR
    client --&gt; f5-loadbalancer
    f5-loadbalancer --&gt; haproxy1
    f5-loadbalancer --&gt; haproxy2
    subgraph node1
        haproxy1 --&gt; alfresco1
    end
    subgraph node2
        haproxy2 --&gt; alfresco1
        haproxy1 --&gt; alfresco2
        haproxy2 --&gt; alfresco2
    end
</code></pre>

<p>Because Alfresco is running in docker containers, they don’t have fixed IP addresses that can be put in the Haproxy configuration.
This is one of the reasons why we have a consul cluster running at each client. A helper process will grab the containers IP addresses from consul, then writes the configuration for haproxy and sends a <code class="language-plaintext highlighter-rouge">SIGUSR2</code> to haproxy, which will cause it to reload its configuration.</p>

<h1 id="a-problem">A problem</h1>

<p>One fateful night, Alfresco needs to be shut down for a couple of hours for a scheduled database maintenance operation.
After this database maintenance, Alfresco is started up again. A manual sanity check indicates that both Alfresco nodes are back up and running and everything is fine.</p>

<p>However, not everything was fine. In the morning, we receive a phone call that requests to Alfresco are failing with HTTP 503 Service Unavailable. After restarting haproxy, these errors subdue.</p>

<h1 id="investigation">Investigation</h1>

<p>As the reader of this blog might already have noticed, I do not like it when things go badly and I don’t know what caused the issue. After all, the only way to prevent the same issue from wreaking havoc again is to find the root cause and to eliminate it.</p>

<p>Since we already restarted some services to recover as fast as possible, some amount of evidence is gone now. But thanks to Kibana, we still have a good amount of data to work with after the fact.</p>

<h2 id="finding-the-culprit">Finding the culprit</h2>

<p>We make a graph of the haproxy access logs, where we graph HTTP 503 responses (red) and all other responses (green).</p>

<p>Since only some requests were answered with an error, we try to find out what’s wrong exactly by splitting the graphs based on which node the haproxy server runs on, and which backend haproxy is sending to.</p>

<p><img src="/assets/haproxy-reload-keepalive/kibana-haproxy-per-node.png" alt="Haproxy HTTP 503 vs other response codes" /></p>

<p>These graphs look very strange in two ways:</p>

<ol>
  <li>Traffic appears to be only sent to one Alfresco node.</li>
  <li>Traffic of the one haproxy server to one backend is returning a 503 error half of the time.</li>
</ol>

<p>It is expected that traffic is only sent to one Alfresco node. Haproxy is configured to use sticky loadbalancing based on source IP. Since all traffic comes from the F5 loadbalancer, there is only one source IP, and everything is sent to the same (first) backend server.</p>

<p>However, that half of the requests to one haproxy server and backend are returning a 503 error is quite unexpected. We know that that haproxy server and that Alfresco backend are running on the same server, so network issues can be excluded as a cause.</p>

<p>Things that we already encountered before that return 503 errors are:</p>

<ul>
  <li>Haproxy configuration is not updated when the Alfresco container is recreated and changed IP address, resulting in haproxy not being able to reach the Alfresco backend</li>
  <li>Docker overlay networking is broken, and containers can’t reach each other</li>
  <li>Alfresco healtcheck failed on both nodes, and both nodes were removed from the haproxy configuration</li>
</ul>

<p>None of these cases explains why some requests are succeeding and others failing, and why the situation recovered after haproxy was restarted.</p>

<h2 id="into-the-failing-haproxy-container">Into the failing haproxy container</h2>

<p>Looking at the logs of that haproxy server in kibana showed something strange:</p>

<pre><code class="language-syslog">&lt;134&gt;Dec 20 05:50:56 haproxy[45085]: xxx.xxx.xxx.194:2133 [20/Dec/2019:05:50:56.643] internet-xxx.xxx.xxx.82 alfresco/alfresco-core0 0/0/1/123/129 200 63108 - - --NN 4/4/0/1/0 0/0 "GET /alfresco/ HTTP/1.1"
&lt;134&gt;Dec 20 05:50:56 haproxy[31628]: xxx.xxx.xxx.196:38412 [20/Dec/2019:05:50:49.099] internet-xxx.xxx.xxx.82 alfresco/alfresco-core0 0/5518/-1/-1/7523 503 212 - - SCNN 1/1/1/0/2 0/0 "GET /alfresco/ HTTP/1.1"
</code></pre>

<p>There are many lines similar to these, where about half of these requests succeed, and the other half fail.</p>

<p>One thing that we notice when looking at the log messages is that failures are consistently logged by <code class="language-plaintext highlighter-rouge">haproxy[31628]</code> and successful requests are logged by <code class="language-plaintext highlighter-rouge">haproxy[45085]</code>. Failing requests are also always coming from the same set of IPs and ports.</p>

<p>In normal circumstances, there should only be one haproxy worker process that handles requests, as <a href="https://cbonte.github.io/haproxy-dconv/2.0/configuration.html#3.1-nbproc">nbproc</a> is set to 1. The fact that 2 worker processes are running at the same time is an indication that something went wrong.</p>

<h2 id="how-haproxy-reloads-its-configuration">How haproxy reloads its configuration</h2>

<p>Like many *nix daemons, haproxy implements a reload mechanism that allows loading a new configuration without stopping and starting the server.
In haproxy, there are multiple ways the reload mechanism works, depending on the mode in which haproxy is started.
We are using the master-worker mode, so I will only describe that mechanism here.</p>

<p>The reload starts when the master process receives a <code class="language-plaintext highlighter-rouge">SIGUSR2</code> signal. The master process will then re-exeute itself with the <code class="language-plaintext highlighter-rouge">-sf</code> parameter, followed by PIDs of all its worker processes.</p>

<p>Next, the master process will start listening on the configured ports with <code class="language-plaintext highlighter-rouge">SO_REUSEPORT</code>, so it can bind in parallel with the existing old worker processes.
New worker processes are started by the master process. They inherit the listening socket and start serving new requests.</p>

<p>Finally, the master process sends the <code class="language-plaintext highlighter-rouge">SIGUSR1</code> signal to all the old workers (listed in the <code class="language-plaintext highlighter-rouge">-sf</code> parameter). The old workers will stop themselves once they have finished processing all existing connections.</p>

<pre><code class="language-mermaid">sequenceDiagram
    activate Old worker
    User--&gt;&gt;Haproxy master: SIGUSR2
    activate Haproxy master
    Haproxy master -&gt;&gt; Haproxy master: Re-execute itself
    Note over Haproxy master: Start listening on ports
    Haproxy master -&gt;&gt; New worker: Execute new worker
    activate New worker
    Haproxy master --x Old worker: SIGUSR1
    Note over Old worker: Stop after processing all pending requests
    deactivate Old worker
    deactivate New worker
</code></pre>

<h2 id="why-master-worker-is-problematic-with-multiple-levels-of-loadbalancers">Why master-worker is problematic with multiple levels of loadbalancers</h2>

<p>This is fine when users enter directly through haproxy. It does not take that long for a normal user to close their connection, as browsers will typically only keep a connection alive for a couple of minutes after the last request is made through that TCP connection.</p>

<p>However, in the case that there is another layer of loadbalancers in front, that loadbalancer can keep sending requests from different clients over the same TCP connection, keeping the process alive indefinitely, and thus keeps sending clients to a no longer existing backend IP.
The F5 loadbalancer healthcheck does not detect this problem, because it is sent with a new TCP connection every time.</p>

<h1 id="solving-the-problem">Solving the problem</h1>

<p>An initial fix consisted of configuring <a href="https://cbonte.github.io/haproxy-dconv/1.8/configuration.html#hard-stop-after"><code class="language-plaintext highlighter-rouge">hard-stop-after</code></a>, to ensure that worker processes will exit after some time.
This way, we still get all the benefits from a soft reload, not dropping all user connections immediately, but we limit the damage that is done when TCP connections are kept alive for a very long time and keep their connections to a stale worker process.</p>

<p>A couple of months later, we embarked on a mission to simplify our architecture and cut out unnecessary complexity.</p>

<p>We found that instead of using Consul, consul-template and haproxy reloads, we could configure haproxy to query Docker DNS directly, by making use of the <a href="https://cbonte.github.io/haproxy-dconv/1.8/configuration.html#server-template"><code class="language-plaintext highlighter-rouge">server-template</code></a> feature.</p>

<p>Being able to remove Consul and consul-template for loadbalancing made the stack simpler to configure and easier to understand for everyone. What previously consisted of 3 containers and a consul cluster is now just one container and only an overlay network.</p>

<p>Configuring haproxy to use Docker DNS is not that hard and works the same in every Docker container.</p>

<pre><code class="language-haproxy">resolvers docker
  nameserver docker 127.0.0.11:53
  resolve_retries 3
  timeout resolve 1s
  timeout retry   1s
  hold other      10s
  hold refused    10s
  hold nx         10s
  hold timeout    10s
  hold valid      10s
  hold obsolete   10s
</code></pre>

<p>Instead of templating all the backend servers in the haproxy configuration file, we can configure them with one line:</p>

<div class="language-plaintext highlighter-rouge"><div class="highlight"><pre class="highlight"><code>backend alfresco
  server-template alfresco- 2 alfresco:8080 check resolvers docker init-addr libc,none

</code></pre></div></div>]]></content><author><name>Lars Vierbergen</name></author><summary type="html"><![CDATA[This December 2019 production outage is brought to you by Haproxy and HTTP keep-alive.]]></summary></entry><entry><title type="html">Breaking DNS with consul and dnsmasq forwarding</title><link href="/2019/08/26/consul-dns.html" rel="alternate" type="text/html" title="Breaking DNS with consul and dnsmasq forwarding" /><published>2019-08-26T00:00:00+00:00</published><updated>2019-08-26T00:00:00+00:00</updated><id>/2019/08/26/consul-dns</id><content type="html" xml:base="/2019/08/26/consul-dns.html"><![CDATA[<p>Last month, I broke DNS on a production cluster by attempting to resolve a hostname.</p>

<h2 id="discovery">Discovery</h2>

<p>On my laptop, I run Debian 10, with systemd-resolved for DNS.
My VPN client hooks into systemd-resolved to add a private DNS server and local domains (including <code class="language-plaintext highlighter-rouge">*.service.consul</code> and <code class="language-plaintext highlighter-rouge">*.node.consul</code>) to the configuration. That makes it very easy to connect to internal services by name. Multiple instances of these services are deployed to achieve high availability, consul DNS will always direct me to a working instance.</p>

<p>Last week I upgraded my laptop from Debian 9 to 10. This also came with a change in defaults for <code class="language-plaintext highlighter-rouge">systemd-resolved</code>: DNSSEC is now set to <code class="language-plaintext highlighter-rouge">allow-downgrade</code> by default, which will send additional DNS queries.</p>

<p>After connecting to the VPN, I try to connect to a consul service. This fails because of a DNS resolution failure.</p>

<p>Manually trying to resolve the name with <code class="language-plaintext highlighter-rouge">dig</code> results in connection timeouts as well.</p>

<p>Then trying with <code class="language-plaintext highlighter-rouge">systemd-resolve</code> results in an other error message.</p>

<div class="language-plaintext highlighter-rouge"><div class="highlight"><pre class="highlight"><code>lars@lars-debian:~$ systemd-resolve xyz.service.consul
xyz.service.consul: resolve call failed: DNSSEC validation failed: no-signature
</code></pre></div></div>

<p>The logs of <code class="language-plaintext highlighter-rouge">systemd-resolved</code> are filled with these DNSSEC validation failures too.
After a lot of retried attempts, <code class="language-plaintext highlighter-rouge">systemd-resolved</code> marks the DNS server as non-DNSSEC capable: <code class="language-plaintext highlighter-rouge">Jul 18 14:31:22 lars-debian systemd-resolved[635]: Server 10.88.30.3 does not support DNSSEC, downgrading to non-DNSSEC mode.</code></p>

<p>Unfortunately, at this time the damage is already done.</p>

<h2 id="walking-in-circles">Walking in circles</h2>

<p>What happened? To check for DNSSEC support, <code class="language-plaintext highlighter-rouge">systemd-resolved</code> sends a DNS query for the <code class="language-plaintext highlighter-rouge">DS</code> record type of <code class="language-plaintext highlighter-rouge">consul.</code> to its configured recursor.</p>

<p>In this case, that is the dnsmasq server running at <code class="language-plaintext highlighter-rouge">10.88.10.3</code>. dnsmasq receives the query, and sees that a specific resolver has been configured for <code class="language-plaintext highlighter-rouge">consul.</code>. It forwards the DNS query to the consul server at <code class="language-plaintext highlighter-rouge">10.88.10.2</code> to resolve it.</p>

<p>Consul is configured with a recursor, so DNS queries for other (not <code class="language-plaintext highlighter-rouge">*.consul</code>) domains would be forwarded to the same dnsmasq server.</p>

<p>However, <a href="https://github.com/miekg/dns/blob/b13675009d59c97f3721247d9efa8914e1866a5b/serve_mux.go#L66-L81">the underlying DNS server implementation</a> of consul delegates <code class="language-plaintext highlighter-rouge">DS</code> queries to the parent handler, which are the configured recursors.</p>

<p>The result is that a <code class="language-plaintext highlighter-rouge">DS consul.</code> query is sent from consul <code class="language-plaintext highlighter-rouge">10.88.10.3</code> to the dnsmasq server running at <code class="language-plaintext highlighter-rouge">10.88.10.2</code>.
Upon seeing a query for <code class="language-plaintext highlighter-rouge">consul.</code>, dnsmasq forwards it back to consul, and round and round in circles it goes.</p>

<h2 id="amplification">Amplification</h2>

<p>Dnsmasq has a maximum number of concurrent pending queries, by default 150.
When this limit is reached, it starts answering <code class="language-plaintext highlighter-rouge">SERVFAIL</code> to all new requests.
This response starts making its way back up the stack of recursive DNS queries.</p>

<p>Upon receiving a <code class="language-plaintext highlighter-rouge">SERVFAIL</code> answer, dnsmasq will retry the DNS query once more.
There is a stack of 150 pending queries that are waiting for a response of the previous query.
Every time a slot becomes available, it is immediately occupied by a retry.</p>

<p>The result is that very little legitimate DNS queries are able to get through.
The only way to resolve this loop is to break it by restarting either dnsmasq or consul.</p>

<h2 id="conclusion">Conclusion</h2>

<p>Don’t create a loop in your DNS recursors’ configuration.
In our case, nothing was querying consul directly anyways, since the dnsmasq server was configured the system resolver.</p>

<p>I <a href="https://github.com/hashicorp/consul/issues/6183">reported an issue</a> to consul, because either the documentation or the code is incorrect. This lead us to think that our configuration was okay.</p>]]></content><author><name>Lars Vierbergen</name></author><summary type="html"><![CDATA[Last month, I broke DNS on a production cluster by attempting to resolve a hostname.]]></summary></entry><entry><title type="html">Automatically installing requirements for a Python CLI application</title><link href="/2019/07/14/python-autoinstall-requirements.html" rel="alternate" type="text/html" title="Automatically installing requirements for a Python CLI application" /><published>2019-07-14T00:00:00+00:00</published><updated>2019-07-14T00:00:00+00:00</updated><id>/2019/07/14/python-autoinstall-requirements</id><content type="html" xml:base="/2019/07/14/python-autoinstall-requirements.html"><![CDATA[<p>Sometimes when I write small commandline applications in Python, I need to depend on some library in PyPi.</p>

<p>It is common to install these dependencies in a virtualenv instead of installing them globally on the system.
However, this would mean that to use this small commandline tool, I would first need to activate the virtualenv before running the command.
When using and developing these utilities, I do not want to have to keep in mind to activate the correct virtualenv every time.</p>

<p>And I also do not want to globally install all libraries that the application depends on, because that may result in a dependency hell when two tools use different, incompatible versions of the same library.</p>

<h1 id="a-polyglot">A polyglot</h1>

<p>While working on the <a href="https://ctf.ulyssis.org">ULYSSIS CTF</a>, <a href="https://github.com/ULYSSIS-KUL/ulyssisctf-writeups/tree/master/2018/programming/python-bashing/">one of those challenges</a> made me think about an interesting approach that embeds a shellscript at the start of a Python file.</p>

<p>The basic structure of such a file consists of starting with a shellscript inside a Python docstring, and then following it with actual Python code.</p>

<div class="language-sh highlighter-rouge"><div class="highlight"><pre class="highlight"><code><span class="s1">''''</span><span class="nb">echo</span> <span class="s2">"Shell code here"</span>
<span class="nb">exit</span>
<span class="s1">'''
print("Python code here")
</span></code></pre></div></div>

<p>When run with a shell, <code class="language-plaintext highlighter-rouge">''''</code> is interpreted as two strings, which does nothing at all. Shell scripts are somewhat executed line by line, so nothing after <code class="language-plaintext highlighter-rouge">exit</code> is interpreted and the shell does not attempt to execute Python code.</p>

<p>When run with Python, everything between triple quotes is regarded as a multiline string, so it is not parsed. Python does not execute any of the shell code inside the multiline string.</p>

<p>Code is valid in different programming languages is also called <a href="https://en.wikipedia.org/wiki/Polyglot_(computing)">a polyglot</a>. In this case, both pieces of code are quite readable, and not totally interwoven like most polyglots are.</p>

<h1 id="automatically-setting-up-a-virtualenv">Automatically setting up a virtualenv</h1>

<p>The implementation details of the embedded installer should not through to the usage of the script in any way.</p>

<p>To be able to provide a seamless experience, we will need to:</p>

<ol>
  <li><a href="#figuring-out-where-the-script-is-located">Figure out where the script is located, so the virtualenv can be created in a folder next to it.</a></li>
  <li><a href="#automatically-create-virtualenv-and-install-dependencies">Automatically create the virtualenv and install dependencies.</a></li>
  <li><a href="#update-dependencies-that-have-changed">Update dependencies when they have changed.</a></li>
  <li><a href="#kicking-off-python-with-the-same-environment-and-arguments">Kick off the Python script with the same environment, working directory and parameters.</a></li>
  <li><a href="#handling-signals">Handling signals sent to the process</a></li>
</ol>

<p>And finally, <a href="#putting-everything-together">put everything together in one script.</a></p>

<h2 id="figuring-out-where-the-script-is-located">Figuring out where the script is located</h2>

<p>To be able to run our script from any directory, we have to figure out where the script is located.
In a shellscript, parameters passed on the commandline are numbered <code class="language-plaintext highlighter-rouge">$1</code> (first parameter) to <code class="language-plaintext highlighter-rouge">$9</code> (9th parameter).
The variable <code class="language-plaintext highlighter-rouge">$0</code> is also available, and this variable refers to the script itself.</p>

<p>Let’s experiment a bit with the values that this variable can take in different situations.</p>

<ol>
  <li>The script is called directly with a full path. e.g.: <code class="language-plaintext highlighter-rouge">lars@lars-debian:~$ /home/lars/my-tool/prog.py</code></li>
  <li>The script is called with a partial path. e.g.: <code class="language-plaintext highlighter-rouge">lars@lars-debian:~/my-tool$ ./prog.py</code></li>
  <li>The script is on <code class="language-plaintext highlighter-rouge">$PATH</code>. e.g.: <code class="language-plaintext highlighter-rouge">lars@lars-debian:~$ PATH="/home/lars/my-tool:$PATH" prog.py</code></li>
  <li>The script is a symlink. e.g.: <code class="language-plaintext highlighter-rouge">lars@lars-debian:~$ ln -s /home/lars/my-tool/prog.py bin/prog; ./bin/prog</code></li>
  <li>The script is a symlink on <code class="language-plaintext highlighter-rouge">$PATH</code>. e.g.: <code class="language-plaintext highlighter-rouge">lars@lars-debian:~$ ln -s /home/lars/my-tool/prog.py bin/prog; PATH="~/bin:$PATH" prog</code></li>
</ol>

<p>Let’s create a very simple script, and place it in <code class="language-plaintext highlighter-rouge">/home/lars/my-tool/prog.py</code>. (Don’t forget to make it executable with <code class="language-plaintext highlighter-rouge">chmod +x</code>)</p>

<div class="language-sh highlighter-rouge"><div class="highlight"><pre class="highlight"><code><span class="c">#!/bin/sh</span>
<span class="nb">echo</span> <span class="s2">"</span><span class="nv">$0</span><span class="s2">"</span>
</code></pre></div></div>

<p>The different situations give following result:</p>

<ol>
  <li>Script is called directoy with a full path: <code class="language-plaintext highlighter-rouge">$0=/home/lars/my-tool/prog.py</code></li>
  <li>Script is called with a partial path: <code class="language-plaintext highlighter-rouge">$0=./prog.py</code></li>
  <li>The script is on <code class="language-plaintext highlighter-rouge">$PATH</code>: <code class="language-plaintext highlighter-rouge">$0=/home/lars/my-tool/prog.py</code></li>
  <li>The script is a symlink: <code class="language-plaintext highlighter-rouge">$0=./bin/prog</code></li>
  <li>The script is a symlink on <code class="language-plaintext highlighter-rouge">$PATH</code>: <code class="language-plaintext highlighter-rouge">$0=/home/lars/bin/prog</code></li>
</ol>

<p>All these situations need to be normalized to the canonical path, the <em>actual</em> location of the script.</p>

<p>The <code class="language-plaintext highlighter-rouge">realpath</code> command is used to resolve symlinks, and it also resolves relative paths.</p>

<p>With <code class="language-plaintext highlighter-rouge">realpath</code>, all the above situations result in the same path: <code class="language-plaintext highlighter-rouge">$(realpath "$0")=/home/lars/my-tool/prog.py</code>.</p>

<p>To cut off the filename of the full path, we can use the <code class="language-plaintext highlighter-rouge">dirname</code> command.</p>

<div class="language-sh highlighter-rouge"><div class="highlight"><pre class="highlight"><code><span class="c">#!/bin/sh</span>
<span class="nv">SCRIPT_DIR</span><span class="o">=</span><span class="s2">"</span><span class="si">$(</span><span class="nb">dirname</span> <span class="s2">"</span><span class="si">$(</span><span class="nb">realpath</span> <span class="s2">"</span><span class="nv">$0</span><span class="s2">"</span><span class="si">)</span><span class="s2">"</span><span class="si">)</span><span class="s2">"</span>
</code></pre></div></div>

<h2 id="automatically-create-virtualenv-and-install-dependencies">Automatically create virtualenv and install dependencies</h2>

<p>The next step is to automatically create a virtualenv if none exists, and then immediately install the dependencies of the script.</p>

<p>The virtualenv is located in a hidden folder, <code class="language-plaintext highlighter-rouge">.venv</code>, that is placed in the same directory as the script itself.
Dependencies are also in the same directory, in a standard <code class="language-plaintext highlighter-rouge">requirements.txt</code> file.</p>

<p>We assume that the <code class="language-plaintext highlighter-rouge">venv</code> python module is globally installed, because that is the preferred way to create a virtualenv in Python 3.</p>

<p>Because the script should stop immediately when any error occurs, we use <code class="language-plaintext highlighter-rouge">/bin/sh -e</code> as shebang. A failing shell command will cause the interpreter to exit immediately, instead of continuing to the next command.</p>

<div class="language-sh highlighter-rouge"><div class="highlight"><pre class="highlight"><code><span class="c">#!/bin/sh -e</span>
<span class="nv">SCRIPT_DIR</span><span class="o">=</span><span class="s2">"</span><span class="si">$(</span><span class="nb">dirname</span> <span class="s2">"</span><span class="si">$(</span><span class="nb">realpath</span> <span class="s2">"</span><span class="nv">$0</span><span class="s2">"</span><span class="si">)</span><span class="s2">"</span><span class="si">)</span><span class="s2">"</span>
<span class="k">if</span> <span class="o">[</span> <span class="o">!</span> <span class="nt">-e</span> <span class="s2">"</span><span class="nv">$SCRIPT_DIR</span><span class="s2">/.venv"</span> <span class="o">]</span><span class="p">;</span> <span class="k">then</span> <span class="c"># If .venv does not exist</span>
    python3 <span class="nt">-m</span> venv <span class="s2">"</span><span class="nv">$SCRIPT_DIR</span><span class="s2">/.venv"</span> <span class="c"># Create a venv</span>
    <span class="nb">.</span> <span class="s2">"</span><span class="nv">$SCRIPT_DIR</span><span class="s2">/.venv/bin/activate"</span> <span class="c"># Then activate it</span>
    pip <span class="nb">install</span> <span class="nt">-r</span> <span class="s2">"</span><span class="nv">$SCRIPT_DIR</span><span class="s2">/requirements.txt"</span> <span class="c"># And install requirements with pip</span>
<span class="k">fi</span>
</code></pre></div></div>

<h2 id="update-dependencies-that-have-changed">Update dependencies that have changed</h2>

<p>The previous script installs dependencies correctly. However, it does not update the dependencies when a change is made to the <code class="language-plaintext highlighter-rouge">requirements.txt</code> file.
You will need to remove the <code class="language-plaintext highlighter-rouge">.venv</code> folder manually and rerun the script to install new dependencies. Or, you need to activate the virtualenv manually and then run <code class="language-plaintext highlighter-rouge">pip install -U -r requirements.txt</code>.</p>

<p>We can improve this behavior by storing a hash of the <code class="language-plaintext highlighter-rouge">requirements.txt</code> file, and running pip again when the hash has changed.</p>

<div class="language-sh highlighter-rouge"><div class="highlight"><pre class="highlight"><code><span class="c">#!/bin/sh -e</span>
<span class="nv">SCRIPT_DIR</span><span class="o">=</span><span class="s2">"</span><span class="si">$(</span><span class="nb">dirname</span> <span class="s2">"</span><span class="si">$(</span><span class="nb">realpath</span> <span class="s2">"</span><span class="nv">$0</span><span class="s2">"</span><span class="si">)</span><span class="s2">"</span><span class="si">)</span><span class="s2">"</span>
<span class="k">if</span> <span class="o">[</span> <span class="o">!</span> <span class="nt">-e</span> <span class="s2">"</span><span class="nv">$SCRIPT_DIR</span><span class="s2">/.venv"</span> <span class="o">]</span><span class="p">;</span> <span class="k">then</span> <span class="c"># If .venv does not exist</span>
    python3 <span class="nt">-m</span> venv <span class="s2">"</span><span class="nv">$SCRIPT_DIR</span><span class="s2">/.venv"</span> <span class="c"># Create a venv</span>
<span class="k">fi</span>
<span class="nb">.</span> <span class="s2">"</span><span class="nv">$SCRIPT_DIR</span><span class="s2">/.venv/bin/activate"</span> <span class="c"># Then activate it</span>

<span class="nv">REQUIREMENTS_HASH</span><span class="o">=</span><span class="s2">"</span><span class="nv">$SCRIPT_DIR</span><span class="s2">/.venv/requirements-hash"</span>
<span class="c"># Create a requirements hash file when none exists yet</span>
<span class="k">if</span> <span class="o">[</span> <span class="o">!</span> <span class="nt">-e</span>  <span class="s2">"</span><span class="nv">$REQUIREMENTS_HASH</span><span class="s2">"</span> <span class="o">]</span><span class="p">;</span> <span class="k">then
    </span><span class="nb">echo</span> <span class="s2">"0000000000000000000000000000000000000000  ../requirements.txt"</span> <span class="o">&gt;</span> <span class="s2">"</span><span class="nv">$REQUIREMENTS_HASH</span><span class="s2">"</span>
<span class="k">fi
</span><span class="nv">PREV_DIR</span><span class="o">=</span><span class="s2">"</span><span class="si">$(</span><span class="nb">pwd</span><span class="si">)</span><span class="s2">"</span>
<span class="nb">cd</span> <span class="s2">"</span><span class="nv">$SCRIPT_DIR</span><span class="s2">/.venv"</span>
<span class="k">if</span> <span class="o">!</span> <span class="nb">sha1sum</span> <span class="nt">--check</span> <span class="nt">--status</span> <span class="s2">"</span><span class="nv">$REQUIREMENTS_HASH</span><span class="s2">"</span><span class="p">;</span> <span class="k">then</span> <span class="c"># If the hash does not match</span>
    pip <span class="nb">install</span> <span class="nt">-U</span> <span class="nt">-r</span> <span class="s2">"</span><span class="nv">$SCRIPT_DIR</span><span class="s2">/requirements.txt"</span> <span class="c"># Install requirements with pip</span>
    <span class="nb">sha1sum</span> ../requirements.txt <span class="o">&gt;</span> <span class="s2">"</span><span class="nv">$REQUIREMENTS_HASH</span><span class="s2">"</span> <span class="c"># Update requirements hash</span>
<span class="k">fi
</span><span class="nb">cd</span> <span class="s2">"</span><span class="nv">$PREV_DIR</span><span class="s2">"</span>
</code></pre></div></div>

<h2 id="kicking-off-python-with-the-same-environment-and-arguments">Kicking off python with the same environment and arguments</h2>

<p>We already learned about the <code class="language-plaintext highlighter-rouge">$0</code> variable in a shellscript. It refers to the script file that is executed.
The script parameters are in variables <code class="language-plaintext highlighter-rouge">$1</code> to <code class="language-plaintext highlighter-rouge">$9</code>. But there is an other variable, <code class="language-plaintext highlighter-rouge">$@</code>, which is an array of all parameters that are passed to the program. <code class="language-plaintext highlighter-rouge">"$@"</code> can be used to get all parameters, without breaking parameters containing quoted spaces.</p>

<p>Before starting the Python script, it is necessary to activate the virtualenv first. When the virtualenv is activated, we want to run python with the same script file and parameters.</p>

<p>Since we are mixing Python and shell, we will start using the polyglot.
We create a simple shellscript wrapper that directly calls a Python program. To verify that it is working, the Python program will print out its parameters and the working directory.</p>

<div class="language-sh highlighter-rouge"><div class="highlight"><pre class="highlight"><code><span class="c">#!/bin/sh</span>
<span class="s1">''''</span><span class="nb">set</span> <span class="nt">-e</span>
python3 <span class="s2">"</span><span class="nv">$0</span><span class="s2">"</span> <span class="s2">"</span><span class="nv">$@</span><span class="s2">"</span>
<span class="nb">exit</span>
<span class="s1">'''
import sys
import os
print(sys.argv)
print(os.getcwd())
</span></code></pre></div></div>

<p>We can see that the python code is executed, and the parameters are passed correctly.</p>

<div class="language-plaintext highlighter-rouge"><div class="highlight"><pre class="highlight"><code>lars@lars-debian:~/my-tool$ ./prog.py x -y --zz
['./prog.py', 'x', 'y', '-zz']
/home/lars/my-tool
</code></pre></div></div>

<p>The script also works correctly when using symlinks, or when called with a relative path.</p>

<h2 id="handling-signals">Handling signals</h2>

<p>There is a problem with the previous piece of code that may cause problems for programs that send signals to their children.</p>

<p>The direct child process will be the shell script instead of python.</p>

<div class="language-plaintext highlighter-rouge"><div class="highlight"><pre class="highlight"><code>lars@lars-debian:~/my-tool$ ./prog.py&amp;; sleep 1; pstree -Aap $$
zsh,5878
  |-prog.py,21685 ./prog.py
  |   `-python3,21691 ./prog.py
  `-pstree,21698 -Aap 5878
</code></pre></div></div>

<p>Process 21685 is the shell script. This shell script has a child process, 21691, which is the Python program that is running.</p>

<p>Instead of running the Python program as a child process of the shellscript, we can <em>replace</em> the shellscript with the Python program.
Sending signals from a parent process will now reach the Python process instead of being delivered to the shellscript, which would then need to propagate them to the Python process.
It also looks nicer, because then there is no shell process sitting inbetween the caller and the Python program.</p>

<div class="language-sh highlighter-rouge"><div class="highlight"><pre class="highlight"><code><span class="c">#!/bin/sh</span>
<span class="s1">''''</span><span class="nb">set</span> <span class="nt">-e</span>
<span class="nb">exec </span>python3 <span class="s2">"</span><span class="nv">$0</span><span class="s2">"</span> <span class="s2">"</span><span class="nv">$@</span><span class="s2">"</span>
<span class="s1">'''
import sys
import os
import time
print(sys.argv)
print(os.getcwd())
time.sleep(200)
</span></code></pre></div></div>

<div class="language-plaintext highlighter-rouge"><div class="highlight"><pre class="highlight"><code>lars@lars-debian:~/my-tool$ ./prog.py&amp;; sleep 1; pstree -Aap $$
zsh,5878
  |-pstree,22276 -Aap 5878
  `-python3,22268 ./prog.py
</code></pre></div></div>

<p>The <code class="language-plaintext highlighter-rouge">exec</code> shell builtin immediately replaces the shell process with a python process, so there is no need to add an <code class="language-plaintext highlighter-rouge">exit</code> afterwards. After all, the shell process ceases to exist after <code class="language-plaintext highlighter-rouge">exec</code>.</p>

<h2 id="putting-everything-together">Putting everything together</h2>

<p>Putting everything from the previous exploration together, we can create a script that automatically installs its PyPi dependencies from a <code class="language-plaintext highlighter-rouge">requirements.txt</code> file located in the same folder as the script.</p>

<div class="language-sh highlighter-rouge"><div class="highlight"><pre class="highlight"><code><span class="c">#!/bin/sh</span>
<span class="s1">''''</span><span class="nb">set</span> <span class="nt">-e</span>
<span class="nv">SCRIPT_DIR</span><span class="o">=</span><span class="s2">"</span><span class="si">$(</span><span class="nb">dirname</span> <span class="s2">"</span><span class="si">$(</span><span class="nb">realpath</span> <span class="s2">"</span><span class="nv">$0</span><span class="s2">"</span><span class="si">)</span><span class="s2">"</span><span class="si">)</span><span class="s2">"</span>
<span class="k">if</span> <span class="o">[</span> <span class="o">!</span> <span class="nt">-e</span> <span class="s2">"</span><span class="nv">$SCRIPT_DIR</span><span class="s2">/.venv"</span> <span class="o">]</span><span class="p">;</span> <span class="k">then</span> <span class="c"># If .venv does not exist</span>
    python3 <span class="nt">-m</span> venv <span class="s2">"</span><span class="nv">$SCRIPT_DIR</span><span class="s2">/.venv"</span> <span class="c"># Create a venv</span>
<span class="k">fi</span>
<span class="nb">.</span> <span class="s2">"</span><span class="nv">$SCRIPT_DIR</span><span class="s2">/.venv/bin/activate"</span> <span class="c"># Then activate it</span>

<span class="nv">REQUIREMENTS_HASH</span><span class="o">=</span><span class="s2">"</span><span class="nv">$SCRIPT_DIR</span><span class="s2">/.venv/requirements-hash"</span>
<span class="c"># Create a requirements hash file when none exists yet</span>
<span class="k">if</span> <span class="o">[</span> <span class="o">!</span> <span class="nt">-e</span>  <span class="s2">"</span><span class="nv">$REQUIREMENTS_HASH</span><span class="s2">"</span> <span class="o">]</span><span class="p">;</span> <span class="k">then
    </span><span class="nb">echo</span> <span class="s2">"0000000000000000000000000000000000000000  ../requirements.txt"</span> <span class="o">&gt;</span> <span class="s2">"</span><span class="nv">$REQUIREMENTS_HASH</span><span class="s2">"</span>
<span class="k">fi
</span><span class="nv">PREV_DIR</span><span class="o">=</span><span class="s2">"</span><span class="si">$(</span><span class="nb">pwd</span><span class="si">)</span><span class="s2">"</span>
<span class="nb">cd</span> <span class="s2">"</span><span class="nv">$SCRIPT_DIR</span><span class="s2">/.venv"</span>
<span class="k">if</span> <span class="o">!</span> <span class="nb">sha1sum</span> <span class="nt">--check</span> <span class="nt">--status</span> <span class="s2">"</span><span class="nv">$REQUIREMENTS_HASH</span><span class="s2">"</span><span class="p">;</span> <span class="k">then</span> <span class="c"># If the hash does not match</span>
    pip <span class="nb">install</span> <span class="nt">-U</span> <span class="nt">-r</span> <span class="s2">"</span><span class="nv">$SCRIPT_DIR</span><span class="s2">/requirements.txt"</span> <span class="c"># Install requirements with pip</span>
    <span class="nb">sha1sum</span> ../requirements.txt <span class="o">&gt;</span> <span class="s2">"</span><span class="nv">$REQUIREMENTS_HASH</span><span class="s2">"</span> <span class="c"># Update requirements hash</span>
<span class="k">fi
</span><span class="nb">cd</span> <span class="s2">"</span><span class="nv">$PREV_DIR</span><span class="s2">"</span>
<span class="nb">exec </span>python3 <span class="s2">"</span><span class="nv">$0</span><span class="s2">"</span> <span class="s2">"</span><span class="nv">$@</span><span class="s2">"</span>
<span class="s1">'''
import sys
import os
print(sys.argv)
print(os.getcwd())
sys.exit(3)
</span></code></pre></div></div>]]></content><author><name>Lars Vierbergen</name></author><summary type="html"><![CDATA[Sometimes when I write small commandline applications in Python, I need to depend on some library in PyPi.]]></summary></entry><entry><title type="html">Nextcloud &amp;amp; Cloudflare: Investigation into excessive data usage</title><link href="/2019/06/20/nextcloud-cloudflare.html" rel="alternate" type="text/html" title="Nextcloud &amp;amp; Cloudflare: Investigation into excessive data usage" /><published>2019-06-20T00:00:00+00:00</published><updated>2019-06-20T00:00:00+00:00</updated><id>/2019/06/20/nextcloud-cloudflare</id><content type="html" xml:base="/2019/06/20/nextcloud-cloudflare.html"><![CDATA[<p>Or, how 3 well designed components behave stupidly together.</p>

<p>I host a medium-sized <a href="https://nextcloud.com">Nextcloud</a> installation that is quite actively used.</p>

<p>Recently, I was notified by my users that performance is extremely bad. Upon investigation, it was clear something bad was going on.
Data transfer was multiplied by 40 compared to the previous period.</p>

<p><img src="/assets/nextcloud-cloudflare/bandwidth-2018.png" alt="Data transfer in june-july 2018" />
<img src="/assets/nextcloud-cloudflare/bandwidth-2019.png" alt="Data transfer in june-july 2019" /></p>

<p>This increase in data transfer usage resulted in exhausting the allowed transfer per month after only 10 days.
With the provider this server is hosted with, going over the allowed datatransfer does not result in extra charges.
Instead, they throttle the bandwidth to 10Mbps.</p>

<h1 id="the-components">The components</h1>

<h2 id="nextcloud">Nextcloud</h2>

<p>The VPS also runs some less-bandwidth intensive services other than Nextcloud.
For isolation and accounting purposes, a separate PHP-fpm pool is used for running Nextcloud.</p>

<p>To avoid it eating all RAM, the pool is limited to a maximum of 6 children.
This means at most 6 requests can be handled in parallel.
Under normal circumstances this limited amount of parallellism is not a problem.
The maximum is hit occasionally, and in that case the new request has to wait until a previous request has finished.</p>

<p>When a file is being downloaded, this uses a PHP-fpm process for the full duration it takes to download the file.
Because uploading a file is normally not limited by the networkspeed (the response is sent to cloudflare, not the end-user directly), this does not pose a problem and processes are freed up quickly again.</p>

<p>However, when bandwidth becomes the limiting factor, uploading the file becomes slower. This means the PHP-fpm processes will spend a longer time to serve a single request, quickly exhausting the available pool.</p>

<p>Here you can see that the active PHP-fpm processes almost never fall below the maximum anymore after the bandwidth cap is applied.</p>

<p><img src="/assets/nextcloud-cloudflare/machine-traffic.png" alt="Outgoing traffic from the server" />
<img src="/assets/nextcloud-cloudflare/fpm-active.png" alt="Active PHP-fpm processes" /></p>

<p><strong>Key behavior</strong>: On all files served from the repository, cache control headers are set.</p>

<div class="language-plaintext highlighter-rouge"><div class="highlight"><pre class="highlight"><code>Cache-Control: no-store, no-cache, must-revalidate
Pragma: no-cache
</code></pre></div></div>

<h2 id="pdfjs">PDF.js</h2>

<p>PDF.js is embedded in Nextcloud and used to display PDF documents from the filesystem.</p>

<p><strong>Key behavior</strong>: Uses HTTP Byte-Range requests when the remote server supports them to fetch only the parts of the file that it needs.</p>

<h2 id="cloudflare">Cloudflare</h2>

<p>Cloudflare is put in front of the Nextcloud instance, acting as a barrier to block bad bots and to cache static files to reduce data usage and increase speed.</p>

<p>The cache settings of Cloudflare are set to its defaults, which means static files are cached and HTML is not cached.</p>

<p><strong>Key behavior</strong>: Tries to serve Byte-Range requests from cache. If the file is not in the Cloudflare cache, it is requested in full to cache it. Cloudflare also respects Cache-Control headers.</p>

<h1 id="the-result-20-30-times-more-data-transfered-than-necessary">The result: 20-30 times more data transfered than necessary</h1>

<p>What happens when a user opens a PDF file?</p>

<ol>
  <li>PDF.js sends a byte-range request for the metadata of the PDF.</li>
  <li>Cloudflare sends a request for the full PDF file. The request looks like a static file, so they probably want to cache it.</li>
  <li>Nextcloud sends a no-cache header and sends back the full PDF.</li>
  <li>Cloudflare receives the PDF, but can’t cache it. It responds to PDF.js with the partial content it requested and then discards the file.</li>
  <li>PDF.js recognizes that the server supports byte-range requests, and keeps using them to load pages on demand.</li>
  <li>User scrolls through the PDF. Every new page that needs to be loaded fires off an other byte-range request.</li>
  <li>Requests are handled by Cloudflare, the full file is requested from the origin server and a partial response is sent back to the client.</li>
</ol>

<p>Repeat this for multiple pages of a PDF when a user is scrolling through them. Most of the PDFs are scanned content, so they have reasonably large pages.</p>

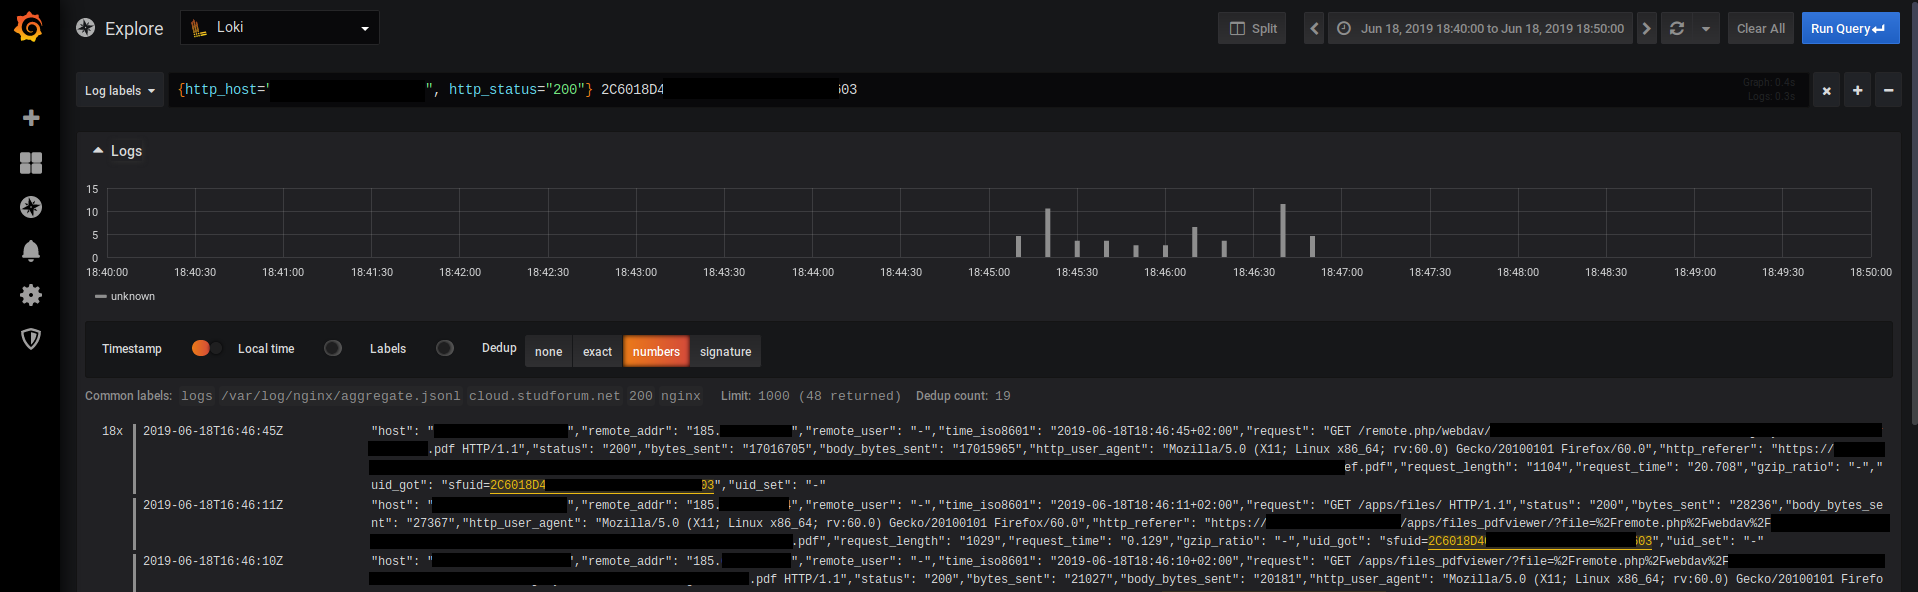
<p><img src="/assets/nextcloud-cloudflare/pdfjs-partial.png" alt="Byte-range requests sent by PDF.js" />
<a href="/assets/nextcloud-cloudflare/pdfjs-requests.png"><img src="/assets/nextcloud-cloudflare/pdfjs-requests.png" alt="Full responses by the server" /></a></p>

<h1 id="how-to-fix">How to fix</h1>

<p>You have 2 options if you want to fix this issue.</p>

<p>The first and most simple option is to simply disable Cloudflare for the domain you run Nextcloud from. Of course, this solution also has the downside that static assets of Nextcloud are no longer cached by Cloudflare and you no longer have the protection either.</p>

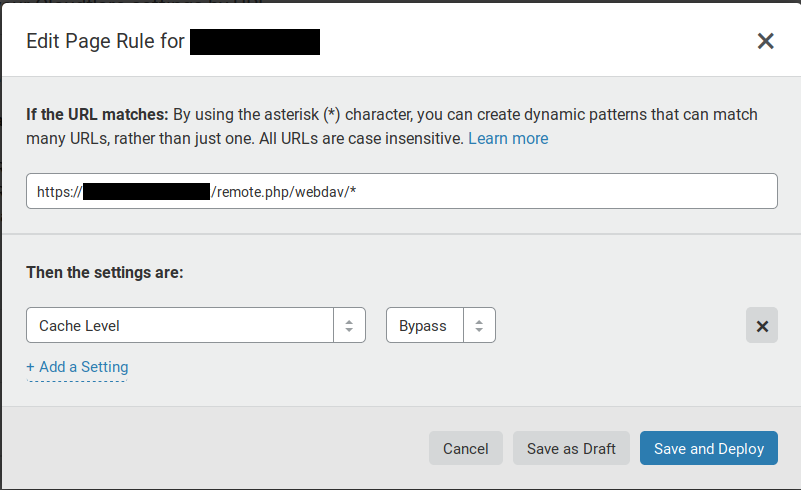
<p>The second option, which seems to work for now, is to put in a page rule in Cloudflare to bypass the cache for all Nextcloud WebDAV requests.
<img src="/assets/nextcloud-cloudflare/cloudflare-page-rule.png" alt="Bypass cache for Nextcloud WebDAV" /></p>

<h2 id="results">Results</h2>

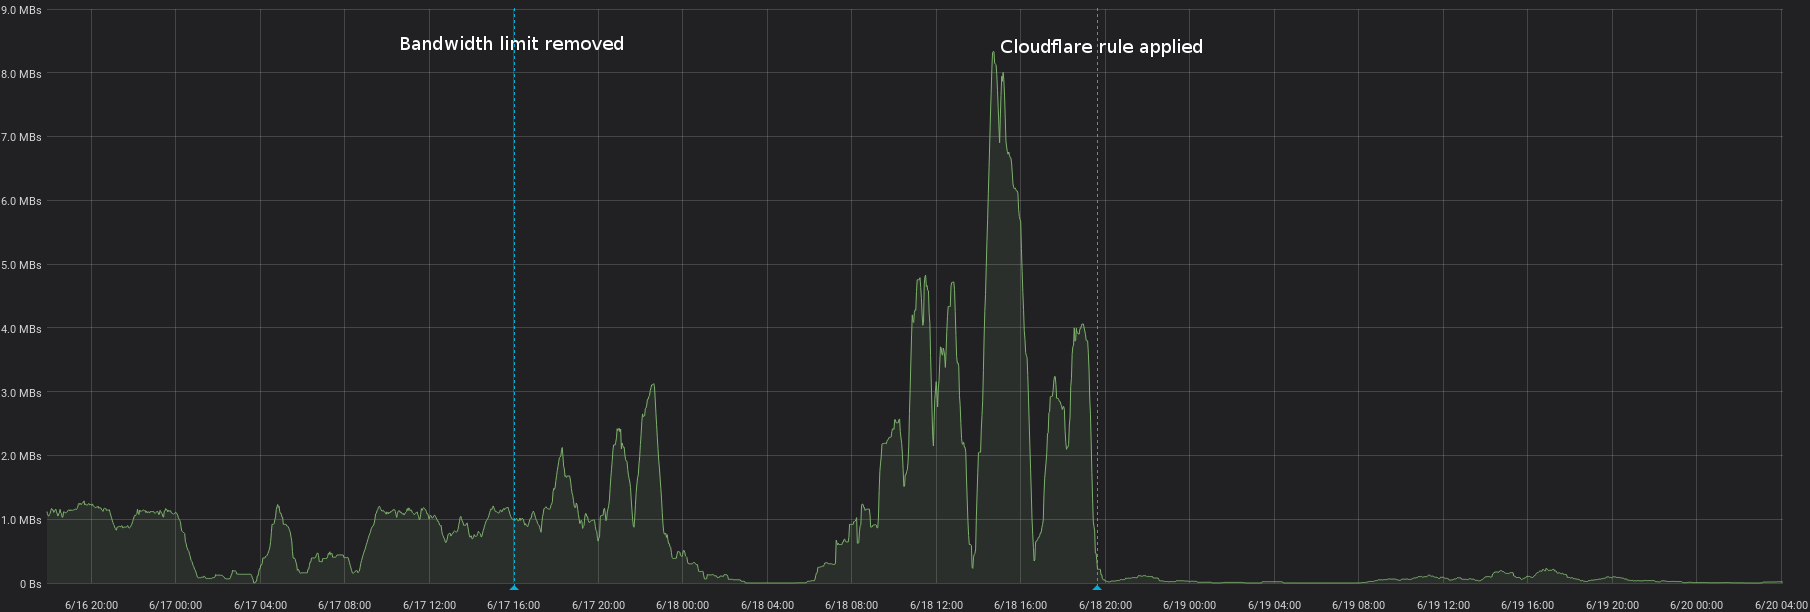
<p>After bypassing the cache for WebDAV requests, the amount of bytes transmitted through the Nextcloud WebDAV endpoint immediately dropped to a fraction of what it previously was.</p>

<p><a href="/assets/nextcloud-cloudflare/webdav-traffic.png"><img src="/assets/nextcloud-cloudflare/webdav-traffic.png" alt="WebDAV traffic before and after" /></a></p>

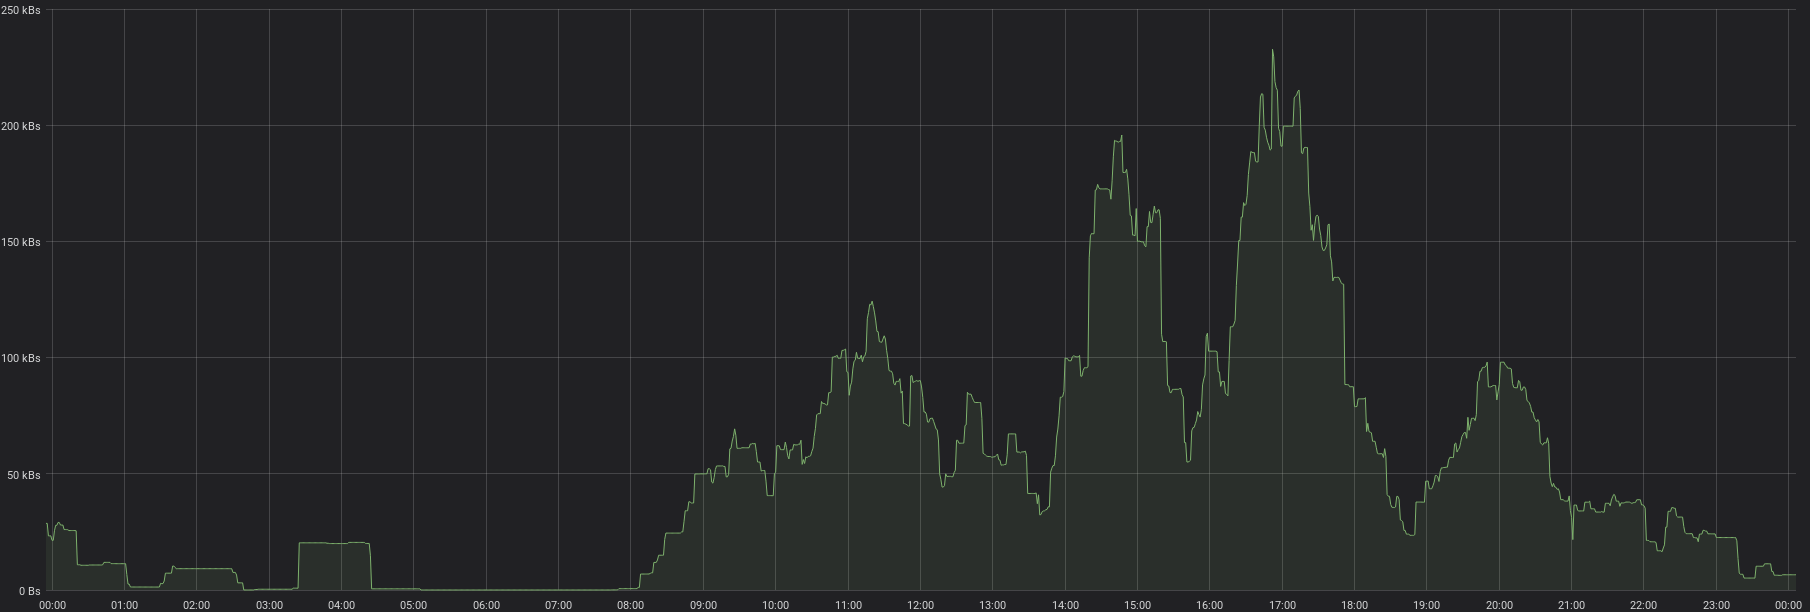
<p>A more detail view after applying the fix. Transfer rates went from 5 MB/s and over to mostly under 200 kB/s, which is a reduction of 25 times.</p>

<p><a href="/assets/nextcloud-cloudflare/webdav-traffic-after.png"><img src="/assets/nextcloud-cloudflare/webdav-traffic-after.png" alt="WebDAV traffic after, zoomed in" /></a></p>]]></content><author><name>Lars Vierbergen</name></author><summary type="html"><![CDATA[Or, how 3 well designed components behave stupidly together.]]></summary></entry><entry><title type="html">Creating a parser in PHP</title><link href="/2013/08/09/creating-a-parser-in-php.html" rel="alternate" type="text/html" title="Creating a parser in PHP" /><published>2013-08-09T07:27:07+00:00</published><updated>2013-08-09T07:27:07+00:00</updated><id>/2013/08/09/creating-a-parser-in-php</id><content type="html" xml:base="/2013/08/09/creating-a-parser-in-php.html"><![CDATA[<p>For my latest project, <a href="https://github.com/vierbergenlars/Norch-PHP-Client/">Norch-PHP-Client</a>, I had to
  create a simple parser for a user-supplied string.</p>
<p>I'll try to describe the process I followed to create the parser here. It was a struggle to get to a minimal parser,
  but it certainly was an educational experience.</p>
<p>The parser is built in two pieces, a lexer and a compiler. This is something I remembered from how C compilers and
  friends are built.</p>


<h1>The lexer</h1>
<p>The lexer converts the string to tokens. It knows and validates the syntax of the 'language', and returns some stream
  of tokens representing keywords, strings, integers, ...</p>
<p>In my case, all tokens actually are strings, but they have a different meaning. The lexer derives the meaning from
  special characters in the neighborhood of the token. Usually the character is right in front, or right behind the
  token.</p>
<p>For example: <code>title</code> is just a string, but <code>title:</code> is a field name. So we associate the tokens
  <code>T_STRING</code> and <code>T_FIELD_NAME</code> with them.</p>
<p>You may want to <a href="https://gist.github.com/vierbergenlars/6186002">have a look at the code</a> while reading
  the next paragraphs, as my explanation makes a lot references to it.</p>
<p>To create the lexer, we loop over the string one character at a time. I prefer to do that with a while-loop instead
  of a for-loop, so I can choose whether to increment the loop variable or not.</p>
<p>Within the loop, we fetch a character of the string. Then a huge switch-statement executes the right code for the
  character we just read.</p>
<ul>
  <li>'\': Escape character. Just append the next character as-is to the current token.</li>
  <li>&lt;space&gt;: the end of a token. Put it in the array and create a new one</li>
  <li>':': If there is nothing in front (there is a space right in front): Syntax error. If there is something in front
    of it that has not yet a token id assigned, it is a T_FIELD_NAME, else syntax error. Put it in the array and create
    a new token T_FIELD_VALUE (that's what comes after a colon)</li>
  <li>'^': If there is nothing in front: Syntax error. If the thing in front has no token yet, it's T_FIELD_NAME, else
    it's an error. Put it in the array, and create a new token T_FIELD_WEIGHT. Read an integer into the token. Put it in
    the array, and if a colon follows, put the T_FIELD_NAME up again. (This simplifies the compiler a lot)</li>
  <li>'@': If there is something in front: Syntax error. Else, the current token is a T_SEARCH_FIELD.</li>
  <li>'"': Quoted string. It must have a space in front (or, the current token must not contain any text yet). Read an
    encapsulated string (up to the next quote).</li>
  <li>Anything else: Just append it to the current token.</li>
</ul>
<p>All characters consumed? Return an array with the tokens for the compiler to use.</p>
<h1>The compiler</h1>
<p>The compiler converts the tokens it receives to actual code.</p>
<p>Basically, it's just another big switch-statement in a loop. But now, we loop over the tokens.</p>
<p>Using a foreach-loop is not possible, because we sometimes need to consume two tokens at a time.</p>
<p>So: If the token is a T_STRING: Append it to the search query.</p>
<p>If it's a T_FIELD_NAME: Take the next token, and make sure there is one.</p>
<ul>
  <li>It's a T_FIELD_VALUE: call the addFilter() function with the field name and the field value.</li>
  <li>It's a T_FIELD_WEIGHT: call the addWeight() function with the field name and the field weight</li>
  <li>It's something else: Compile error: unexpected token</li>
</ul>
<p>It's a T_FIELD_SEARCH: call addSearchField() with the field.</p>
<p>It's something else: Our lexer messed up. Compile error.</p>
<h1>Conclusion</h1>
<p>Simple parsers are quite easy to write manually, and are a <em>lot</em> faster than generated regex-based ones.</p>
<p>However, if it's the first parser you write, things can take a while figuring out. You'll have to bite the bullet,
  and start experimenting.</p>
<p><strong>And don't forget to write tests!</strong> If you break a parser, and you don't figure it out immediately,
  you're gonna have a hard time fixing it.</p>
<p><img class="aligncenter size-full wp-image-118" alt="If you don't write tests, you're gonna have a bad time."
    src="/assets/40434677.jpg" width="400" height="400" /></p>]]></content><author><name>Lars Vierbergen</name></author><summary type="html"><![CDATA[For my latest project, Norch-PHP-Client, I had to create a simple parser for a user-supplied string. I'll try to describe the process I followed to create the parser here. It was a struggle to get to a minimal parser, but it certainly was an educational experience. The parser is built in two pieces, a lexer and a compiler. This is something I remembered from how C compilers and friends are built.]]></summary></entry><entry><title type="html">Instructions: Setting up Conky</title><link href="/2013/06/07/tutorial-setting-up-conky.html" rel="alternate" type="text/html" title="Instructions: Setting up Conky" /><published>2013-06-07T16:16:17+00:00</published><updated>2013-06-07T16:16:17+00:00</updated><id>/2013/06/07/tutorial-setting-up-conky</id><content type="html" xml:base="/2013/06/07/tutorial-setting-up-conky.html"><![CDATA[<p>In this post, I'll show you how to set up Conky on Ubuntu in exactly the same way I did.<br />
  This is a follow-up to <a title="Tweaking Ubuntu Gnome with&nbsp;Conky"
    href="/2013/06/07/tweaking-ubuntu-gnome-with-conky.html">my earlier post on
    Conky</a>. (Some people say it looks like the user interface from <em>Minority Report</em>. I have never seen the
  movie, so I have no idea how it looks like.)<br />
</p>


<p>The <code>rings.lua</code> script is not entirely mine.&nbsp;<a
    href="http://londonali1010.deviantart.com/art/quot-Rings-quot-Meters-for-Conky-141961783">This guy</a>&nbsp;created
  the base, I merely tweaked it.</p>
<h1>Step 1: Get the stuff</h1>
<p><a href="https://gist.github.com/vierbergenlars/5693854/download">Download</a>&nbsp;my the Gist.<br />
  Install Conky through the command line, or use the software center.<br />
  <code>$ sudo apt-get install conky</code><br />
  <i>Note: the $ Just means you're typing this in a shell, you don't have to type it.</i></p>
<p>Move the files from the zip to their indicated place. You'll need to create a <code>~/.conky</code> directory to move
  the scripts to.</p>
<p>Move the font files (<code>.ttf</code>) to&nbsp;<code>/usr/share/fonts/</code>.<br />
  <code>$ sudo mv *.ttf /usr/share/fonts/</code></p>
<h1>Step 2: Setting up</h1>
<p><img class="alignright size-medium wp-image-46" alt="Screenshot from 2013-06-07 17:08:48"
    src="/assets/screenshot-from-2013-06-07-170848.png?w=300" width="300" height="240" /></p>
<ol>
  <li>Set <code>background.jpg</code> as desktop background. (You should be able to figure this out yourself)</li>
  <li>Make sure Conky starts up together with your session</li>
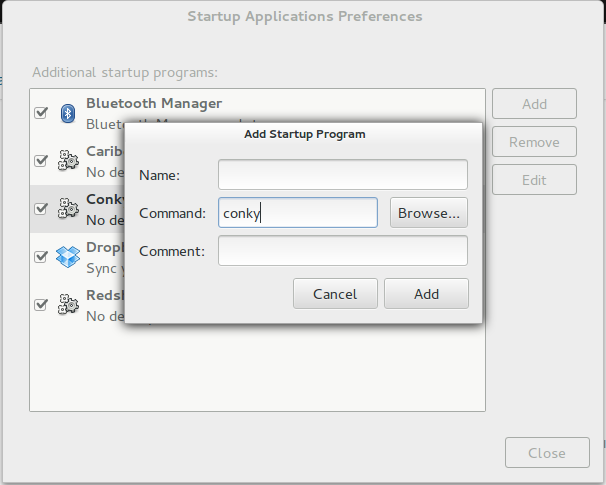
  <li>Open <em>Startup applications</em>, click the&nbsp;<em>Add</em> button.</li>
  <li>Type <code>conky</code> in the text box after <em>Command.</em></li>
  <li>Make the shell scripts executable&nbsp;<code>$ chmod +x ~/.conky/*.sh</code></li>
  <li>Log out and log in again to make sure Conky starts up.</li>
</ol>
<h1>Step 3: Tweaking</h1>
<p>The <code>.conkyrc</code> is tweaked specifically for my computer, my number of cpus, and my screen size. It may not
  look nicely aligned on yours.</p>
<h2>Fixing the alignment</h2>
<ol>
  <li>Open up ~/.conkyrc in your favorite text editor. (The screenshots are made in <em>vim</em>, if you wonder ;))</li>
  <li><a href="/assets/screenshot-from-2013-06-07-171812.png"><img
        class="alignright size-medium wp-image-50" alt="Screenshot from 2013-06-07 17:18:12"
        src="/assets/screenshot-from-2013-06-07-171812.png" width="300" height="87" /></a>On line 39,
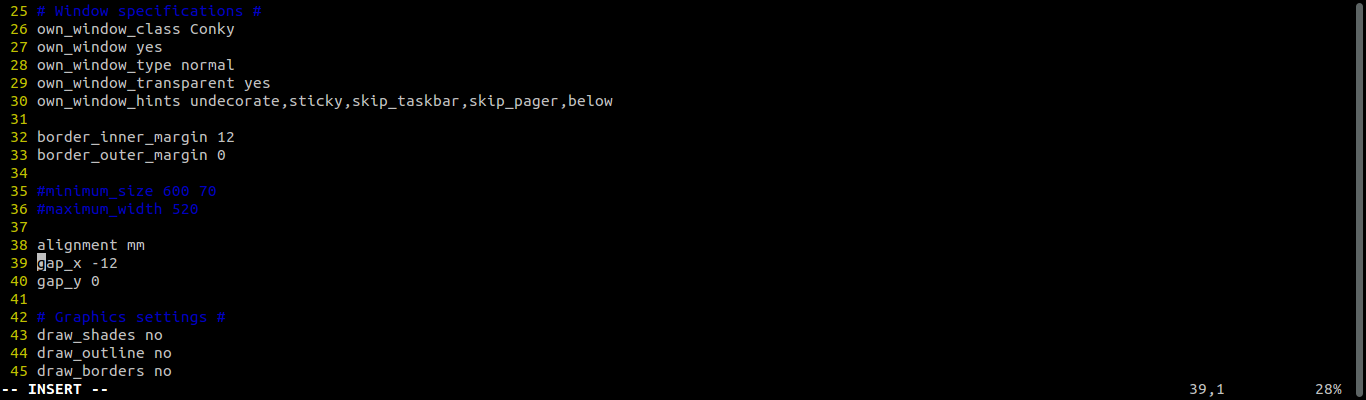
    change the value of&nbsp;<code>gap_x</code> until the vertical borders
    of the conky window aligns with the border of the innermost rectangle on the background. Subtracting moves the
    screen to the right, adding moves the screen to the left.</li>
  <li>If you can't get the screen to fit nicely horizontally, try adjusting border_inner_margin on line 32. (This may
    happen if you have a&nbsp;<strong>huge</strong> monitor which stretches the background)</li>
  <li>On line 40, change the value of <code>gap_y</code> until the bottom border of the Conky window aligns with the
    border of the 2nd rectangle of the background. Substracting moves the screen to the bottom, adding moves the screen
    to the top. (I got this aligned by accident :))</li>
  <li>Save the file. Conky automatically reloads the file, and restarts.</li>
</ol>
<h2>Fixing the number of CPUs</h2>
<p>I happen to have 2 CPUs in my computer, but I left in the extension for 4 CPUs in comments.</p>
<ol>
  <li>Open up <code>~/.conkyrc</code>, uncomment lines 76 &amp; 77 (remove the #)</li>
  <li><a title="Click for a screenshot showing lines needing change"
      href="/assets/screenshot-from-2013-06-07-173631.png" target="_blank">Remove lines 78 &amp; 79,
      they add padding for the case of 2 CPUs.</a></li>
  <li>Open up <code>~/.conky/rings.lua</code></li>
  <li><a title="Click for a screenshot showing lines needing change"
      href="/assets/screenshot-from-2013-06-07-173825.png" target="_blank">Uncomment lines 100 to
      127</a> (just remove --[[ on line 100, and ]] on line 127)</li>
  <li><a title="Click for a screenshot showing lines needing change"
      href="/assets/screenshot-from-2013-06-07-174515.png" target="_blank">Update indexes on line 437,
      439 and 441. Change the 5 to 7.</a></li>
  <li>Save the file. Conky will automatically reload the file.</li>
</ol>
<h2>Removing battery configuration</h2>
<p>Desktop users seem to have some problems with the battery configuration.</p>
<p>To remove the battery configuration, open up <code>~/.conkyrc</code>, and remove line 98 and 99.<br />
  Next, Open <code>~/.conky/rings.lua</code> and remove line 268 to 295.</p>
<p>If I missed something, or it is not working for you, please let me know in the comments. Positive feedback is also
  welcome, of course!</p>]]></content><author><name>Lars Vierbergen</name></author><summary type="html"><![CDATA[In this post, I'll show you how to set up Conky on Ubuntu in exactly the same way I did. This is a follow-up to my earlier post on Conky. (Some people say it looks like the user interface from Minority Report. I have never seen the movie, so I have no idea how it looks like.)]]></summary></entry><entry><title type="html">Tweaking Ubuntu Gnome with Conky</title><link href="/2013/06/07/tweaking-ubuntu-gnome-with-conky.html" rel="alternate" type="text/html" title="Tweaking Ubuntu Gnome with Conky" /><published>2013-06-07T13:41:39+00:00</published><updated>2013-06-07T13:41:39+00:00</updated><id>/2013/06/07/tweaking-ubuntu-gnome-with-conky</id><content type="html" xml:base="/2013/06/07/tweaking-ubuntu-gnome-with-conky.html"><![CDATA[<p><img class="size-full" alt="Tweaking Ubuntu Gnome with Conky"
    src="/assets/screenshot-from-2013-06-07-135209.png" />
</p>


<p>
  I took some time to configure my Ubuntu Gnome desktop. The background and the conky indicator are tweaked to match up
  perfectly in colors and borders. Want this configuration too? All files are available in a <a
    href="https://gist.github.com/vierbergenlars/5693854">Gist</a><br />
  This is just a short post listing all my resources I used. <del datetime="2013-06-07T16:18:40+00:00">I'll try to get
    full instructions up soon.</del> <ins datetime="2013-06-07T16:18:40+00:00"><a
      title="Tutorial: Setting up&nbsp;Conky"
      href="/2013/06/07/tutorial-setting-up-conky.html">Full installation instructions
      are available</a></ins></p>
<p>Some extra <a href="https://extensions.gnome.org/">gnome extensions</a> I also use (on the screenshot left to right,
  top to bottom):</p>
<ul>
  <li><a href="https://extensions.gnome.org/extension/444/cpu-freq/">Cpufreq</a></li>
  <li><a href="https://extensions.gnome.org/extension/517/caffeine/">Caffeine</a></li>
  <li><a href="https://extensions.gnome.org/extension/36/lock-keys/">Lock keys</a></li>
  <li><a href="https://extensions.gnome.org/extension/442/drop-down-terminal/">Drop down terminal</a></li>
  <li><a href="https://extensions.gnome.org/extension/307/dash-to-dock/">Dash to dock</a> &amp; <a
      href="https://extensions.gnome.org/extension/427/workspaces-to-dock/">Workspaces to dock</a></li>
  <li><a href="https://extensions.gnome.org/extension/7/removable-drive-menu/">Removable drive menu</a> (not visible)
  </li>
  <li><a href="https://extensions.gnome.org/extension/645/hi-jack/">Hi, jack!</a> (not visible, only shows message area
    when mouse in right-bottom corner</li>
  <li><a href="https://extensions.gnome.org/extension/15/alternatetab/">Alternatetab</a></li>
</ul>
<p><img class="size-full" alt="" src="/assets/screenshot-from-2013-06-07-135249.png" />
</p>]]></content><author><name>Lars Vierbergen</name></author><summary type="html"><![CDATA[]]></summary></entry><entry><title type="html">Instructions: Using a GitHub OAuth token with Composer &amp;amp; Travis CI</title><link href="/2013/06/06/using-a-github-oauth-token-with-composer-travis-ci.html" rel="alternate" type="text/html" title="Instructions: Using a GitHub OAuth token with Composer &amp;amp; Travis CI" /><published>2013-06-06T06:22:53+00:00</published><updated>2013-06-06T06:22:53+00:00</updated><id>/2013/06/06/using-a-github-oauth-token-with-composer-travis-ci</id><content type="html" xml:base="/2013/06/06/using-a-github-oauth-token-with-composer-travis-ci.html"><![CDATA[<p>I use <a href="https://github.com/">GitHub</a> to host my open-source projects. Most of them are PHP libraries.</p>
<p>For testing those libraries, I use <a href="https://travis-ci.org/">Travis CI</a>. Every commit I push to the GitHub
  repository gets tested by their CI (Continuous Integration) server.</p>
<p>Of course, I use <a href="http://getcomposer.org">Composer</a> for managing dependencies on my PHP projects.</p>
<p>Usually everything works out fine, but <a
    href="https://travis-ci.org/vierbergenlars/defer/jobs/7817209">sometimes</a> the dependency installation fails
  because I reached the GitHub API limit. That's <a href="http://developer.github.com/v3/#rate-limiting">60 calls</a>
  per hour per IP address for
  unauthenticated requests. Since Travis runs <em>a lot</em> of tests for various projects, it is possible that
  an&nbsp;earlier&nbsp;project already exhausted the API limit.</p>
<p>Because composer keeps waiting for input of a username and password, Travis aborts the build after 10 minutes, and it
  shows up as errored.</p>


<h1>The bad solution</h1>
<p>I have seen <a
    href="http://blog.simplytestable.com/creating-and-using-a-github-oauth-token-with-travis-and-composer/">other</a> <a
    href="http://drafts.easybib.com/post/38230669404/composer-github-travisci">blogs</a> suggesting to create an OAuth
  token, and just include it in your repository.&nbsp;<strong>That is a very bad idea!</strong>&nbsp;The token grants
  unlimited access to your account via the GitHub API. If someone else got a hold of it, they can do all kinds of bad
  stuff to your account.</p>
<h1>The good solution</h1>
<p>Travis supports encrypted environment variables. That is great news, as we can encrypt or OAuth token and put it in
  an environment variable, right? Now the only thing Composer needs to do is read the env variable and use that token to
  authenticate to the API.</p>
<p>Unfortunately, it is not that simple. Composer does look for an OAuth environment variable.</p>
<h1>The ugly solution</h1>
<p>Luckily, Composer does read&nbsp;<em>~/.composer/config.json</em>, and merges it with the
  package's&nbsp;<em>composer.json</em>. So, it's just a matter of getting the environment variable in the configuration
  file.</p>
<h2>Step 1: Encrypt the environment variable</h2>
<p>Travis provides a gem that helps you to set up secure environment variables. Go ahead and install it.<br />
  <em>Note: You'll need ruby and rubygems to install the travis gem.</em></p>
<p>[code language="bash"]gem install travis[/code]</p>
<p>Next, we need an OAuth token to reach the GitHub API. Go to the&nbsp;<a
    href="https://github.com/settings/applications"><em>Applications</em></a> section of your account settings, and add
  a personal API token.</p>
<p>It is time to encrypt the token. Navigate to the project directory, and encrypt the environment variable.</p>
<p>[code language="bash"]travis encrypt GH_OAUTH=4584c14558afe5580abec2d57c2256e6cb804cbf --add env.global[/code]</p>
<p>The encrypted variable gets added to the project's&nbsp;<em>.travis.yml</em> automatically.</p>
<h2>Step 2: Write a script to generate <em>~/.composer/config.json</em></h2>
<p>We still need a script to create the configuration file. It is a very basic script.</p>
<p>[code language="bash"]if [ &quot;$TRAVIS_SECURE_ENV_VARS&quot; = &quot;true&quot; ];<br />
  then<br />
  mkdir ~/.composer/<br />
  echo '{ &quot;config&quot;: {&quot;github-oauth&quot;:{&quot;github.com&quot;: ' &gt; ~/.composer/config.json<br />
  echo &quot;\&quot;$GH_OAUTH\&quot;&quot; &gt;&gt; ~/.composer/config.json<br />
  echo '}}}' &gt;&gt; ~/.composer/config.json<br />
  fi[/code]</p>
<p>First, it checks whether Travis has secure env variables enabled. For security purposes, they get disabled when
  testing a pull request.</p>
<p>Then, create the <em>~/.composer</em> directory and write the configuration to the configuration file.</p>
<h2>Step 3: Add setup script to <em>.travis.yml</em></h2>
<p>Finally, the script has to be run before any Composer command is executed. Add the setup script
  in&nbsp;<em>.travis.yml</em>. You may also need to <em>chmod +x</em>&nbsp;the script before it will execute.<br />
  To disable all interactive questions Composer may ask, add <code>COMPOSER_NO_INTERACTION=1</code> to your environment
  variables.</p>
<h2>That's it</h2>
<p>You may want to do this for every project using Composer and Travis. It is important to run&nbsp;<em>travis
    encrypt</em> separately for each project, as the encryption key is different for each project.</p>
<p>If you rather learn by example, you may want to look at <a
    href="https://github.com/vierbergenlars/defer/tree/8eae9b45ef00d86a60c6c4938e2bc17e5c2c2168">vierbergenlars/defer@8eae9b</a>
</p>
<p><strong>Update</strong>: The nice guys from travis-ci <a
    href="http://about.travis-ci.org/blog/2013-06-17-time-for-a-vm-update/">have added an API token for GitHub</a>.</p>]]></content><author><name>Lars Vierbergen</name></author><summary type="html"><![CDATA[I use GitHub to host my open-source projects. Most of them are PHP libraries. For testing those libraries, I use Travis CI. Every commit I push to the GitHub repository gets tested by their CI (Continuous Integration) server. Of course, I use Composer for managing dependencies on my PHP projects. Usually everything works out fine, but sometimes the dependency installation fails because I reached the GitHub API limit. That's 60 calls per hour per IP address for unauthenticated requests. Since Travis runs a lot of tests for various projects, it is possible that an&nbsp;earlier&nbsp;project already exhausted the API limit. Because composer keeps waiting for input of a username and password, Travis aborts the build after 10 minutes, and it shows up as errored.]]></summary></entry></feed>